Pages

Saturday, June 20, 2020

Devotion Collar Instructions and Tips!


#Mewsery - Devotion Collar @Harajuku - June 20th  //GIVEAWAY IN PROGRESS//

The Devotion collar comes in four different styles. Each style has 5 different collar band colors, 3 metal options and each heart comes in various colors. This posts is created to serve as a guide, with basic overviews and instructions regarding your collar. Especially if you plan on using the scripted RLV version. Bare in mind, the collar is petite but, I have left it so you can resize it, regardless of the body you are wearing.


How to adjust your leash 

The collar labeled as RLV, contains the open collar scripts/system. This means, you can enable RLV on your firestorm viewer or secondlife viewer and use it with this collar. If you are new to open collar, I highly recommend setting yourself as the owner of your collar first before granting permissions to anyone else. I would also recommend familiarizing yourself with RLV and how the open collar system works. There is a wealth of information and various resources available on the web especially on the open collar website ( https://www.opencollar.at/rlv.html). 
 
When you hand your leash to your owner, significant other or play partner, you will notice a chain linking your collar to their leash. This leash can be seen if you turn on particles in the graphics settings ( Press crtl and P ), make sure you have particles all the way up. You do have the option to update the type of leash from a chain to a ribbon, you can even change the colors, this is something that is standard with any open collar/ peanut collar or RLV collar you use in secondlife. Positioning the leash with the Devotion collar would require you to move the small ball hovering near the heart. The ball is invisible, so you will need to turn on transparencies by pressing crtl + alt + t. You can move that small ball by checking off edit linked parts in your edit menu.!

( still updating )
▂▂▂▂▂▂▂▂▂▂▂▂▂▂▂▂▂▂▂▂▂▂▂▂ 
#MEWSERY SOCIALS & MORE 

Tuesday, May 26, 2020

Makeup is a Girl's Best Friend!

Hello Kittens!

Here’s an overview of some recent makeup packs released at Mewsery. I have had so much fun playing with makeup, thanks to BOM and the endless possibilities of that. Majority of these are bom and genus appliers. The head featured in each ad is actually Genus baby face.

Diamond Dew Eyeshadow Palette @Mewsery
✨Glitter Girls✨ @Mewsery

Lost Girls Makeup Collection for {69L HumpDay Sale} @Mewsery

CryBaby Eyebrows @Mewsery
▂▂▂▂▂▂▂▂▂▂▂▂▂▂▂▂▂▂▂▂▂▂▂▂ 
#MEWSERY SOCIALS & MORE 

Sunday, May 3, 2020

Razor Earrings

Hello Everyone!

I wanted to share these razor earring I made recently. A demo is available in black. It comes in both black and pink options, the ribbon can be changed with the multiple text options, and you can leave it blank too. You can find these in the accessory section at Mewsery!

Razor Earrings - Pink & Black @Mewsery

▂▂▂▂▂▂▂▂▂▂▂▂▂▂▂▂▂▂▂▂▂▂▂▂ 
#MEWSERY SOCIALS & MORE 

Monday, April 20, 2020

How to Create an AO [Animation Override] on Secondlife

Hello everyone,

I have had a few questions about creating an animation overrider in SL. I know most people use their firestorm viewer and load up the animations there because, it is usually a two step process. But, what happens if you do a clean install? If you wanted to have multiple AOs on at once, one for movement and the other one for static AOs? Well, since I create static AOs, I thought it was time I shared this tip with anyone who is interested.

In this video, I go over there and what to look out for, sorry it starts out slow and then I pick up midway, I was trying to think of all the things I should cover that way I am not rambling about anything unnecessary.

Anyway, I hope this helps out someone. Enjoy xo


This is the SURL to the free animation HUD I reference in the video:
http://maps.secondlife.com/secondlife/Kuso/128/134/23

▂▂▂▂▂▂▂▂▂▂▂▂▂▂▂▂▂▂▂▂▂▂▂▂ 
#MEWSERY SOCIALS & MORE 

Monday, December 2, 2019

How to save MULTIPLE graphic settings in Firestorm

Hello! Issa me!

So today I just wanted to go over something pretty neat that I think most photographers and bloggers... and perhaps designers take advantage of in secondlife. It is the graph settings presents!

You can save multiple settings in this presents tab and it helps you toggle back and forth between each present if you're someone who has a crappy computer like I do, and you need to give your computer a rest after straining it on such high settings for so long.

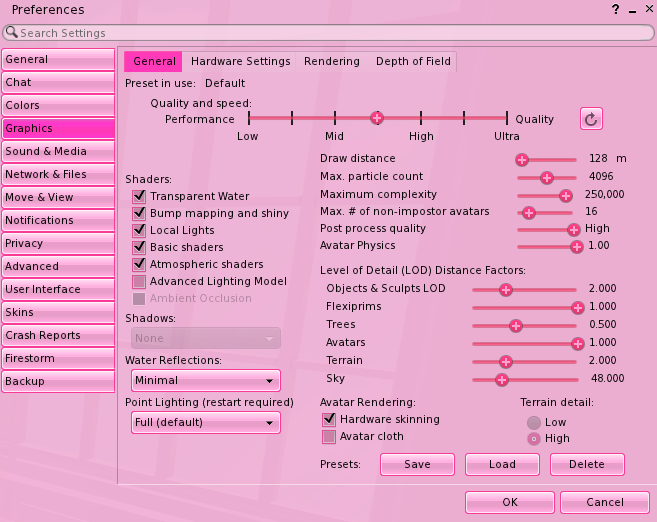
Sometimes, I use this option to reset the shadows if the textures are not rezzing right away because of the high settings or if the textures are becoming blurry, or if my fps drop down to 1.1 haha ( yes, that really happens to me ). Below, I have shared the default and high graphic settings shown in the video above. The default setting is what you will expect to see when you first download and log into firestorm, it's the default setting that LL has saved for us in the viewer. The second setting is what I usually use and it is what i created and saved.

This is what the DEFAULT graphic setting looks like:


This is what my HIGH graphic setting looks like ( the one shown in the video above):


▂▂▂▂▂▂▂▂▂▂▂▂▂▂▂▂▂▂▂▂▂▂▂▂ 
#MEWSERY SOCIALS & MORE 

How to make your firestorm viewer PINK!!

Hello!

Welcome back! I wanted to share another neat trick that I have been using for quite sometime. This is my favorite aspect of the firestorm viewer and the reason I enjoy secondlife ( believe it or not). You can turn your viewer into a totally DOLL-LIKE-PINK TEMPLATE!

I have shared a brief demonstration of the entire process in the video below. You will need to hop into your preferences >> SKINS and then select the starlight option. You must press okay and then relog in order to complete the process. This is probably one of the special things about firestorm!


AND HERE IS A NEAT SECRET! Your ban lines look like little dancing unicorns! So you don't feel so bad about being locked out AHAHAHA


The end! Enjoy xo
▂▂▂▂▂▂▂▂▂▂▂▂▂▂▂▂▂▂▂▂▂▂▂▂ 
#MEWSERY SOCIALS & MORE 

Friday, November 29, 2019

How to SAVE YOUR MODIFIED Windlight Settings for Future Use!

Hello!

Welcome back! Today I hadecided to create another video sharing some things I forgot to share in the first video. This is the video you want to watch after you have downloaded and installed the Mewsery windlight settings from HERE and watched part one of this windlight series HERE.


I hope this video brings insight into how you can save your windlight settings for future use after modifying them. Once you save the windlight you have modified, it will NOT override the previously saved one unless you use the same exact name as the previous windlight saved ( this will all make sense once you start dabbling with your settings and saving each new windlight you make!).

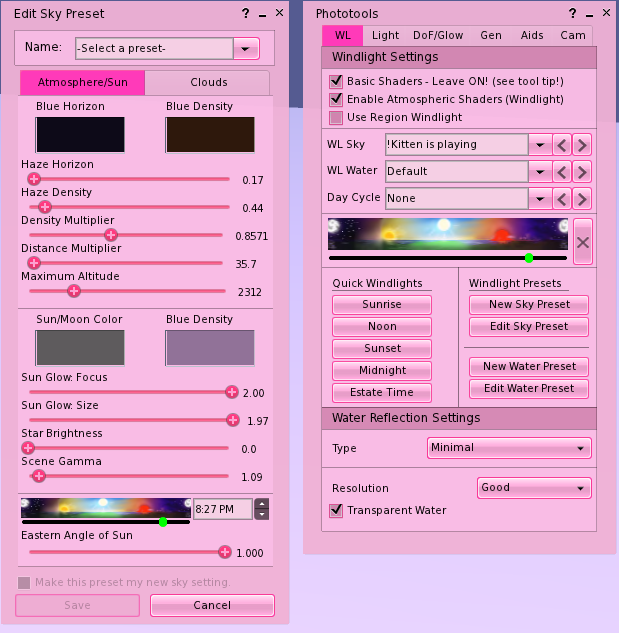
Here are screenshots of the windlight I created in this video and saved randomly. You are welcome to use these settings!

The "Phototools" window is like your windlight picker.
The "Edit SKY present" window is basically your driver.

▂▂▂▂▂▂▂▂▂▂▂▂▂▂▂▂▂▂▂▂▂▂▂▂ 
#MEWSERY SOCIALS & MORE 

Tuesday, November 26, 2019

Mewsery - xoKitty [Windlights] Download & Instructions

Hello,

I have wanted to share this for quite some time now. I've finally gathered the collection of different windlight settings I often play with in most of my ADs or snapshots on facebook. You are free to share, modify and re-create these to your heart's content. Welcome to the Mewsery xo

To download this, simply click this link below. And click the download icon on the top right corner of the screen.


DOWNLOAD THIS: Mewsery - xoKitty Windlight PACK


HOW TO INSTALL YOUR SPANKING NEW PACK OF WINDLIGHT SETTINGS?!
Check out Linden Labs' comprehensive guide to installing windlight settings on different operating systems! Here: http://wiki.secondlife.com/wiki/WindLight_settings
Step 1
LOG out of secondlife before you proceed with installation.

Step 2
Download and Unzip the Mewsery - xoKitty WIndlight Settings shown above. Then open the skies folders and drag the .xml files into the skies subdirectories under the right windlight folder, depending on your operating system and viewer you are using.

Step 3
Then log back into secondlife and pull up phototools, see the video below for instructions on that.


Depending on your operating system, your windlight settings folder may be under one of the following;
Windows XP
C:\Documents and Settings\USERNAME\Application Data\SecondLife\user_settings\windlight\skies

Windows Vista and 7
C:\Users\USERNAME\AppData\Roaming\SecondLife\user_settings\windlight\skies

MACs
In the Finder, use Go menu > Go to Folder and paste in: /Library/Application Support/SecondLife/user_settings/windlight/skies

Linux
/.secondlife/user_settings/windlight/skies/


U P D A T E 
To add a few more things I have picked up along the way! I have started using black dragon! You are not required to use EEP with black dragon, which means these settings will work flawlessly and you can install it with that viewer. If you mainly use black dragon for photography like I do, here is a new blogpost which features screenshots of my black dragon viewer as well as a clip of what your settings may look like if you end up using the same settings:

Read more here: 
https://mewserysl.blogspot.com/2021/05/black-dragon-screenshot-settings-share.html
▂▂▂▂▂▂▂▂▂▂▂▂▂▂▂▂▂▂▂▂▂▂▂▂ 
#MEWSERY SOCIALS & MORE