Pages

Monday, September 6, 2021

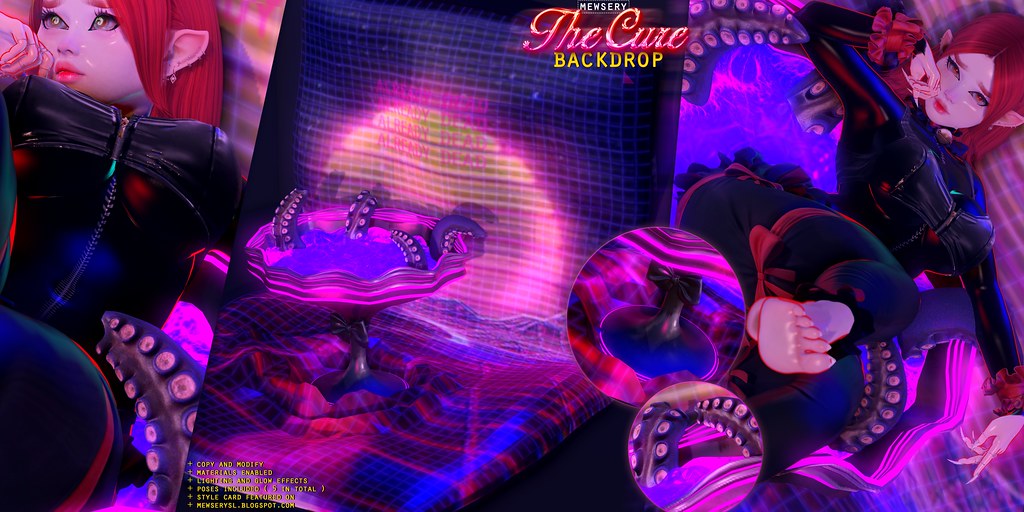
The Cure Backdrop + Pose Pack

#Mewsery - The Cure Backdrop @TokyoZero

 
Hi Friends!
Welcome to another Mewsery release! This is my first backdrop! It is a little out of my element and I am so excited to share with you♥. I wanted to challenge myself and try something different and as a result the Cure backdrop was born. I somehow imagined that if we were living in a dystopian future, your favorite bar will be serving this drink because, obviously tentacles make everything taste better! Haha

This post will include tips, tricks, and other interesting ideas for you to enhance your photography experience. 


▂▂▂▂▂▂▂▂▂▂▂▂▂▂▂▂▂▂▂▂▂▂▂▂🐱🌸 
Here are the basics about 
The Cure BackDrop

+ There are 5 backdrop styles as follows; 

    • The basic version
    • The glow circle version
    • The glow circle version with lights
    • The option with a rotating grid layer
    • The backdrop only version
    • And the glass only version

+ 5 Static Pose Stands are included in fatpack

+ There are pose balls of each pose too!
+ Copy and Modify
+ Taxi to Tokyo Zero  [Sept 10th ~ Sept 30th  https://www.tokyozero.net/ ]
+ Taxi to Mewsery Mainstore


Friendly Reminder: 💡⚡ Mewsery group members receive a 10% discount on all single pose/animation stands and all Couple's poses are 25% off with your group tag ⚡💡


:::::::::::::::::::::::::::::::::::::::::::::::::::::::::::::‹ 🌸 ›::::::::::::::::::::::::::::::::::::::::::::::::::::::
 Here is a preview of what is featured in The Cure Backdrop's folder and what you should expect to see when you purchase the backdrop:


You should expect to see different permissions depending on the item. The backdrops are mostly modify ( If your permissions appear as "no modify" would need to REZ the backdrop to edit because the scripts inside the backdrop make it appear no modify in your inventory but, in reality they are modify ~ hope that makes sense ).

Here are a few tips with pictures to help you customize your backdrop!


▂▂▂▂▂▂▂▂▂▂▂▂▂▂▂▂▂▂▂▂▂▂▂▂🐱🌸
V I D E O   P R E V I E W

[Preview] The Cure Backdrop by #Mewsery @TokyoZero {Sept 10th}


▂▂▂▂▂▂▂▂▂▂▂▂▂▂▂▂▂▂▂▂▂▂▂▂🐱🌸
GRAPHIC AND WINDLIGHT SETTINGS ( optional )


Here is a little video I created sharing some windlight settings that you can try on black dragon to enhance your pictures or photography experience♥ You can also preview the screenshots and a few more items here:  https://mewserysl.blogspot.com/2021/05/black-dragon-screenshot-settings-share.html


▂▂▂▂▂▂▂▂▂▂▂▂▂▂▂▂▂▂▂▂▂▂▂▂ 🐱🌸
O U T F I T   D E T A I L S    S H O W N   I N   A D

 
Hair & Hair Accessories//

Hair: Ruby Hair by [Yomi] 

Body & Deformers//
Body Deformers: BELLY & Waist Cincher by [Body Upgrades] ( How to and info here )
Mesh Body: KUPRA B.O.M. BODY by [ INITHIUM ]
Mesh Head & Ears: lel EvoX BRIANNON 3.0 by Lelutka
Mesh Eyes: by Catwa
 

Skin & Makeup//
Skin: MYOI # 4 NE_102 by MUDSKIN
Shape: DreamBaby by Mewsery
Body Skin: ULTIMATED # CHUBBY1_102 by MUDSKIN_
Eyebrows: CryBaby Eyebrows [lelEvoX][bom].black by #Mewsery
Animated Eye Lens: Elemental Eye // Addon by Psycho Pills
Face blush: Peachy Blush - Pink - EvoX by +FATHER+
Nose Blush: Nose Blush Pink EVOX by Emotional Circus
Eyeliner 1: Bossie. quick eyeliners [lel evoX][BOTTOM LINE]
Eyeliner 2: Bossie. quick eyeliners [lel evoX][INNER 03]
Eyeliner 3: Bossie. quick eyeliners [lel evoX][07]

Outfit, Shoes & Accessories//
Latex Catsuit Zipped BLACK by .:B1:.  ( BOM)
Panties: Talia Panties by AURICA 
Armbands, Collar & Stockings: Sweet Lolita by CryBunBun x Mewsery
Celshade: Kupra High Feet Celshade/Outline by Messy. 
Top: Brandi Zipper Top Kupra by S<3T 

▂▂▂▂▂▂▂▂▂▂▂▂▂▂▂▂▂▂▂▂▂▂▂▂ 
#MEWSERY SOCIALS & MORE 

Saturday, May 29, 2021

Black Dragon - ScreenShot Settings Share!

Hey everyone, 
***Updated***
Please remember that taking your pictures at anything higher than 1000 meters in the sky can give different results. Therefore the best level to take pictures is either 900 meters or less. So consider setting up your platform somewhere around that range or even on the ground if you can. 


I have gotten a few questions about my settings on black dragon. I wanted to preface this by saying... I am still new to black dragon so there is still a lot to learn. I just wanted to share this quick clip featuring the settings I achieved in this video:


First things first. CRTL+0 and CRTL+9 are your friends!!! To avoid that weird fish eye look your photography may have. Sometimes I press down CRTL+0 either 5 or 6 times. When I am on black dragon, I go as far as pressing it 9 or 10 times ahah but, it really helps your picture in my opinion.

If you are using some of the same settings without any lights rezzed, you should be able to receive the same result. Below I have also listed the shader toggles and my windlight settings as well. Remember that each feature you find in black dragon can be enhanced and tweaked to fit your unique scene! 

Enjoy and feel free to ask any questions if you are interested or curious about anything and I will do my best to answer!


The windlight used in this clip is a variation of an old set of windlight settings I shared a while ago. Those settings are still available here:
Black dragon does not require EEP so you can still install these on your viewer and use them instead!


Here are the screenshots featured in the clip above, please use these to fine tune your black dragon settings! Good luck!


▂▂▂▂▂▂▂▂▂▂▂▂▂▂▂▂▂▂▂▂▂▂▂▂ 
#MEWSERY SOCIALS & MORE 

The CryBaby Eyebrows✨💖😀👌❤️😍

CryBaby Eyebrows @Mewsery

Hi Babes!

So, I guess it is time to create an actual blogpost for these eyebrow appliers as I have updated them yet again and wanted to give you several visuals on what the eyebrows will look like in world depending on the head your avy is wearing. Always try the demo before you purchase!

▂▂▂▂▂▂▂▂▂▂▂▂▂▂▂▂▂▂▂▂▂▂▂▂🐱🌸 
Here are the applier options that are currently available;
+ [BOM] Layers ( specifically designed for Genus Mesh Heads )
+ Genus Appliers ( these appliers are available for the eyebrowlayer and tattoo layer )
+ Lelutka Evolution X - BOM layers ( these will fit only the EVO-X line )
+ Taxi to Mewsery Mainstore

The ad features the Genus babyface mesh head. I have now scaled the eyebrows to fit on the lelutka Evolution X mesh heads. The eyebrow shaper included in this pack will be specifically for the Ceylon mesh head but, you are welcome to try it with other eyebrow shapers.

Here is an example of a look I was able to achieve with these eyebrows on the lelutka ceylon head. 


The appearance of these eyebrows will change depending on how you shape your eyebrow shaper, which is why it is important to either wear the eyebrow shaper provided, or tweak your eyebrow shaper when you are trying the demo. Here are a few examples of how these eyebrows could appear, depending on how you use your eyebrow shaper:


Remember that there is a white/tintable option but all other layers allow you to copy and modify easily!


▂▂▂▂▂▂▂▂▂▂▂▂▂▂▂▂▂▂▂▂▂▂▂▂ 
#MEWSERY SOCIALS & MORE 

Tuesday, May 11, 2021

*NEW* Starlight Eye Makeup @Mewsery's Mainstore

#Mewsery - Starlight Eyemakeup
Hiya babes,

So I some how forget to display these at the mainstore after releasing them, so I decided to share this set again in this Wednesday's one day 69L Humpday Sale before officially setting them up at regular price. 

Please try the demo before purchase. 

+ Genus Appliers [ BOM layer ] 
+ Smudged Neon Eye Makeup 
+ With Eyeliner Options 
+ Under eye stars are a separate applier but, can be worn together. 
▂▂▂▂▂▂▂▂▂▂▂▂▂▂▂▂▂▂▂▂▂▂▂▂🐱🌸 
A D  D E T A I L S
+ Eyebrows: CryBaby Eyebrows by #Mewsery
+ Lipstick: Olivia by Velour
+ Face Skin: Yumeko Skin Pale by serotonin. ( Face & Body Skin are sold separately )
+ Body Skin: Body Skin / Legacy / Chubby Cleavage (Pale) by serotonin. ( I use the Legacy version for the Kupra body I wear, it's not perfect but it works)
+ Collar: 118_Bouton_Neck Collar by Sibilla
▂▂▂▂▂▂▂▂▂▂▂▂▂▂▂▂▂▂▂▂▂▂▂▂ 
#MEWSERY SOCIALS & MORE 

Saturday, April 10, 2021

Bloody Tips Deluxe Pack - [ Information ]

#Mewsery - Bloody Tips Deluxe Pack

Hiya babydolls,

Today's release involves an item that was revamped from at least 2 or 3 years ago! I had always wanted to make these appliers BOM and include various color options but, never got around to it until recently. I hope you like this pack! There are 5 color options! Here is an inworld shot of what they will look like:

I have taken a picture of these featured on the Kupra body fingers, so these nails are the actual the base nails that are found on the Kupra body. The color option I chose in this picture below are the pink version but, you are welcome to experiment with the other color options in the pack.

Bare in mind that these are BOM ( Bakes on Mesh ). You can wear these on other bodies but, that body must have BOM activated.


▂▂▂▂▂▂▂▂▂▂▂▂▂▂▂▂▂▂▂▂▂▂▂▂ 
#MEWSERY SOCIALS & MORE 

Saturday, January 9, 2021

*NEW* Love Stick Earrings

Hiya Babes, 

****Update September 26, 2021:::
I have added another set of special edition earrings, these are currently available at a discounted price for the weekend. Please enjoy xo♥

LoveSick Earrings - #Mewsery {60L HW & 65L SKS}


****Update June 26, 2021:::
Pride Edition now available
#Mewsery :Lovesick Earrings ️‍🌈PRIDE EDITION️‍🌈


Hi Babes! 
Welcome to another fun weekend release. These new earrings spell out the words “Love YOU”! Each package includes a HUD. In the HUD, you have the option to change the color of the metals as well as the letter “O”. 

#Mewsery :Lovesick Earrings

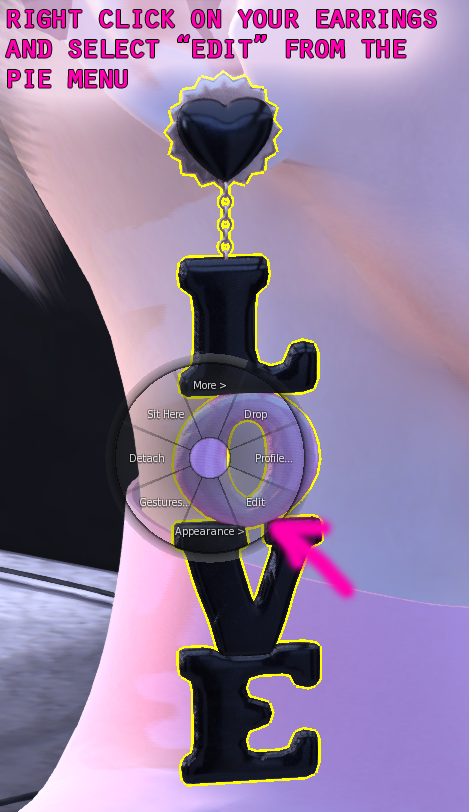
These earrings are also copy and modify, which means you can customize your earrings to your liking such as adding glow, or even making them transparent. I have included some pictures below to show you how to add glow or transparency if that is something you would prefer to do! 


▂▂▂▂▂▂▂▂▂▂▂▂▂▂▂▂▂▂▂▂▂▂▂▂🐱🌸
Outfit Details 
+ Hair: Gaia by Sintiklia
+ Mesh Head: Baby Face W001 by GENUS Project
+ HeadBand: from the GL Aidoll Set by BareRose
+ Eyemakeup: Diamond Dew Shimmer #10 by #Mewsery
+ Eyebrows: CryBaby Eyebrows [bom] in black by #Mewsery
▂▂▂▂▂▂▂▂▂▂▂▂▂▂▂▂▂▂▂▂▂▂▂▂ 
#MEWSERY SOCIALS & MORE 

Saturday, June 20, 2020

Devotion Collar Instructions and Tips!


#Mewsery - Devotion Collar @Harajuku - June 20th  //GIVEAWAY IN PROGRESS//

The Devotion collar comes in four different styles. Each style has 5 different collar band colors, 3 metal options and each heart comes in various colors. This posts is created to serve as a guide, with basic overviews and instructions regarding your collar. Especially if you plan on using the scripted RLV version. Bare in mind, the collar is petite but, I have left it so you can resize it, regardless of the body you are wearing.


How to adjust your leash 

The collar labeled as RLV, contains the open collar scripts/system. This means, you can enable RLV on your firestorm viewer or secondlife viewer and use it with this collar. If you are new to open collar, I highly recommend setting yourself as the owner of your collar first before granting permissions to anyone else. I would also recommend familiarizing yourself with RLV and how the open collar system works. There is a wealth of information and various resources available on the web especially on the open collar website ( https://www.opencollar.at/rlv.html). 
 
When you hand your leash to your owner, significant other or play partner, you will notice a chain linking your collar to their leash. This leash can be seen if you turn on particles in the graphics settings ( Press crtl and P ), make sure you have particles all the way up. You do have the option to update the type of leash from a chain to a ribbon, you can even change the colors, this is something that is standard with any open collar/ peanut collar or RLV collar you use in secondlife. Positioning the leash with the Devotion collar would require you to move the small ball hovering near the heart. The ball is invisible, so you will need to turn on transparencies by pressing crtl + alt + t. You can move that small ball by checking off edit linked parts in your edit menu.!

( still updating )
▂▂▂▂▂▂▂▂▂▂▂▂▂▂▂▂▂▂▂▂▂▂▂▂ 
#MEWSERY SOCIALS & MORE 

Tuesday, May 26, 2020

Makeup is a Girl's Best Friend!

Hello Kittens!

Here’s an overview of some recent makeup packs released at Mewsery. I have had so much fun playing with makeup, thanks to BOM and the endless possibilities of that. Majority of these are bom and genus appliers. The head featured in each ad is actually Genus baby face.

Diamond Dew Eyeshadow Palette @Mewsery
✨Glitter Girls✨ @Mewsery

Lost Girls Makeup Collection for {69L HumpDay Sale} @Mewsery

CryBaby Eyebrows @Mewsery
▂▂▂▂▂▂▂▂▂▂▂▂▂▂▂▂▂▂▂▂▂▂▂▂ 
#MEWSERY SOCIALS & MORE 

Sunday, May 3, 2020

Razor Earrings

Hello Everyone!

I wanted to share these razor earring I made recently. A demo is available in black. It comes in both black and pink options, the ribbon can be changed with the multiple text options, and you can leave it blank too. You can find these in the accessory section at Mewsery!

Razor Earrings - Pink & Black @Mewsery

▂▂▂▂▂▂▂▂▂▂▂▂▂▂▂▂▂▂▂▂▂▂▂▂ 
#MEWSERY SOCIALS & MORE 

Monday, April 20, 2020

How to Create an AO [Animation Override] on Secondlife

Hello everyone,

I have had a few questions about creating an animation overrider in SL. I know most people use their firestorm viewer and load up the animations there because, it is usually a two step process. But, what happens if you do a clean install? If you wanted to have multiple AOs on at once, one for movement and the other one for static AOs? Well, since I create static AOs, I thought it was time I shared this tip with anyone who is interested.

In this video, I go over there and what to look out for, sorry it starts out slow and then I pick up midway, I was trying to think of all the things I should cover that way I am not rambling about anything unnecessary.

Anyway, I hope this helps out someone. Enjoy xo


This is the SURL to the free animation HUD I reference in the video:
http://maps.secondlife.com/secondlife/Kuso/128/134/23

▂▂▂▂▂▂▂▂▂▂▂▂▂▂▂▂▂▂▂▂▂▂▂▂ 
#MEWSERY SOCIALS & MORE 

Monday, December 2, 2019

How to save MULTIPLE graphic settings in Firestorm

Hello! Issa me!

So today I just wanted to go over something pretty neat that I think most photographers and bloggers... and perhaps designers take advantage of in secondlife. It is the graph settings presents!

You can save multiple settings in this presents tab and it helps you toggle back and forth between each present if you're someone who has a crappy computer like I do, and you need to give your computer a rest after straining it on such high settings for so long.

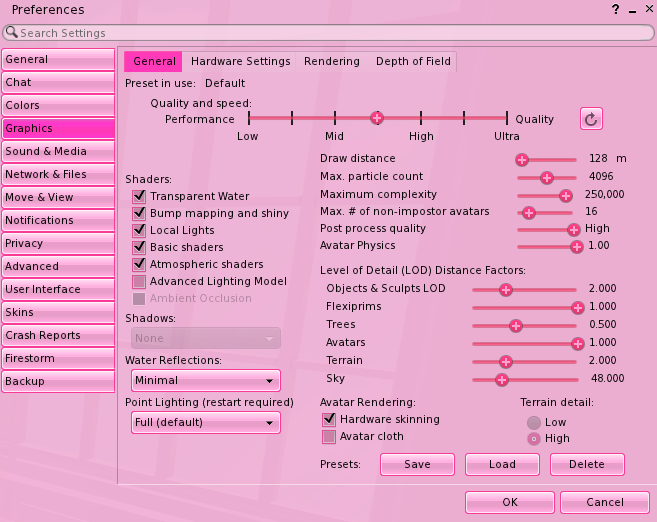
Sometimes, I use this option to reset the shadows if the textures are not rezzing right away because of the high settings or if the textures are becoming blurry, or if my fps drop down to 1.1 haha ( yes, that really happens to me ). Below, I have shared the default and high graphic settings shown in the video above. The default setting is what you will expect to see when you first download and log into firestorm, it's the default setting that LL has saved for us in the viewer. The second setting is what I usually use and it is what i created and saved.

This is what the DEFAULT graphic setting looks like:


This is what my HIGH graphic setting looks like ( the one shown in the video above):


▂▂▂▂▂▂▂▂▂▂▂▂▂▂▂▂▂▂▂▂▂▂▂▂ 
#MEWSERY SOCIALS & MORE 

How to make your firestorm viewer PINK!!

Hello!

Welcome back! I wanted to share another neat trick that I have been using for quite sometime. This is my favorite aspect of the firestorm viewer and the reason I enjoy secondlife ( believe it or not). You can turn your viewer into a totally DOLL-LIKE-PINK TEMPLATE!

I have shared a brief demonstration of the entire process in the video below. You will need to hop into your preferences >> SKINS and then select the starlight option. You must press okay and then relog in order to complete the process. This is probably one of the special things about firestorm!


AND HERE IS A NEAT SECRET! Your ban lines look like little dancing unicorns! So you don't feel so bad about being locked out AHAHAHA


The end! Enjoy xo
▂▂▂▂▂▂▂▂▂▂▂▂▂▂▂▂▂▂▂▂▂▂▂▂ 
#MEWSERY SOCIALS & MORE 

Friday, November 29, 2019

How to SAVE YOUR MODIFIED Windlight Settings for Future Use!

Hello!

Welcome back! Today I hadecided to create another video sharing some things I forgot to share in the first video. This is the video you want to watch after you have downloaded and installed the Mewsery windlight settings from HERE and watched part one of this windlight series HERE.


I hope this video brings insight into how you can save your windlight settings for future use after modifying them. Once you save the windlight you have modified, it will NOT override the previously saved one unless you use the same exact name as the previous windlight saved ( this will all make sense once you start dabbling with your settings and saving each new windlight you make!).

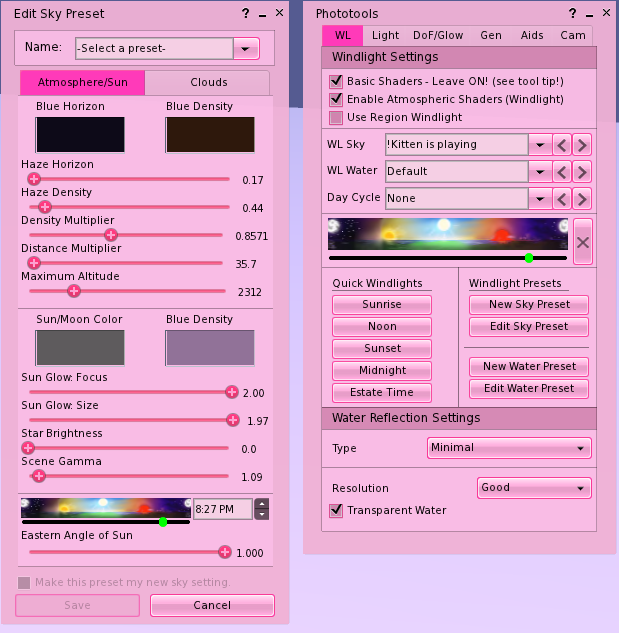
Here are screenshots of the windlight I created in this video and saved randomly. You are welcome to use these settings!

The "Phototools" window is like your windlight picker.
The "Edit SKY present" window is basically your driver.

▂▂▂▂▂▂▂▂▂▂▂▂▂▂▂▂▂▂▂▂▂▂▂▂ 
#MEWSERY SOCIALS & MORE 

Tuesday, November 26, 2019

Mewsery - xoKitty [Windlights] Download & Instructions

Hello,

I have wanted to share this for quite some time now. I've finally gathered the collection of different windlight settings I often play with in most of my ADs or snapshots on facebook. You are free to share, modify and re-create these to your heart's content. Welcome to the Mewsery xo

To download this, simply click this link below. And click the download icon on the top right corner of the screen.


DOWNLOAD THIS: Mewsery - xoKitty Windlight PACK


HOW TO INSTALL YOUR SPANKING NEW PACK OF WINDLIGHT SETTINGS?!
Check out Linden Labs' comprehensive guide to installing windlight settings on different operating systems! Here: http://wiki.secondlife.com/wiki/WindLight_settings
Step 1
LOG out of secondlife before you proceed with installation.

Step 2
Download and Unzip the Mewsery - xoKitty WIndlight Settings shown above. Then open the skies folders and drag the .xml files into the skies subdirectories under the right windlight folder, depending on your operating system and viewer you are using.

Step 3
Then log back into secondlife and pull up phototools, see the video below for instructions on that.


Depending on your operating system, your windlight settings folder may be under one of the following;
Windows XP
C:\Documents and Settings\USERNAME\Application Data\SecondLife\user_settings\windlight\skies

Windows Vista and 7
C:\Users\USERNAME\AppData\Roaming\SecondLife\user_settings\windlight\skies

MACs
In the Finder, use Go menu > Go to Folder and paste in: /Library/Application Support/SecondLife/user_settings/windlight/skies

Linux
/.secondlife/user_settings/windlight/skies/


U P D A T E 
To add a few more things I have picked up along the way! I have started using black dragon! You are not required to use EEP with black dragon, which means these settings will work flawlessly and you can install it with that viewer. If you mainly use black dragon for photography like I do, here is a new blogpost which features screenshots of my black dragon viewer as well as a clip of what your settings may look like if you end up using the same settings:

Read more here: 
https://mewserysl.blogspot.com/2021/05/black-dragon-screenshot-settings-share.html
▂▂▂▂▂▂▂▂▂▂▂▂▂▂▂▂▂▂▂▂▂▂▂▂ 
#MEWSERY SOCIALS & MORE